Orchids are renowned for their exotic beauty and unique charm, captivating plant enthusiasts worldwide. However, to keep these delicate flowers thriving, proper care is essential, and repotting plays a crucial role in their maintenance. Knowing how to repot an orchid is a vital skill for any orchid owner, ensuring the plant remains healthy and continues to produce stunning blooms. This comprehensive guide will walk you through the process, answering all your questions and providing valuable tips for successful repotting.
On This Page
How to Repot an Orchid?
Orchids need repotting not only to accommodate growth but also to refresh their growing medium. Over time, the potting mix breaks down, leading to poor drainage and root health issues. Understanding the right time to repot can make a significant difference in your orchid’s vitality.
Signs Your Orchid Needs Repotting
Recognizing the signs that your orchid needs repotting is the first step to ensuring its ongoing health. Here are some common indicators:
- Roots Growing Out of the Pot: If roots start to emerge from the drainage holes or climb out of the top of the pot, it’s a clear sign your orchid needs more space.
- Potting Medium Breaking Down: Over time, the potting mix decomposes, losing its structure and aeration properties. This can lead to poor drainage and root rot.
- Unhealthy Appearance: An orchid that looks unhealthy, with yellowing leaves or stunted growth, might benefit from a fresh potting mix and more room to grow.
Best Time of Year to Repot Orchids
Timing is crucial when it comes to repotting orchids. The best period to undertake this task is typically:
- Post-Bloom Period: After the flowers have wilted and fallen, the orchid enters a growth phase, making it an ideal time for repotting.
- Seasonal Considerations: Late spring to early summer is generally the best season for repotting, as it coincides with the orchid’s active growth period. However, avoid repotting during extreme weather conditions.
Repotting at the right time ensures minimal stress on the plant, promoting quicker recovery and continued growth.
Preparing to Repot an Orchid
Before you begin the repotting process, it’s essential to gather all the necessary supplies and understand the requirements of your orchid. Proper preparation ensures a smooth and successful repotting experience.
Gathering Necessary Supplies
To repot your orchid effectively, you’ll need the following supplies:
- Orchid Potting Mix: Orchids require a specific type of potting mix that provides excellent aeration and drainage. Common ingredients include bark, perlite, sphagnum moss, and charcoal.
- New Pot: Choose a pot that is one size larger than the current one, with ample drainage holes to prevent waterlogging.
- Sterilized Scissors or Pruners: Clean tools are crucial to avoid introducing diseases or pests to your orchid.
- Gloves: Wearing gloves protects your hands and prevents the transfer of oils or contaminants to the plant.
Having these supplies ready ensures that you can repot your orchid without any interruptions or last-minute scrambles for equipment.
Choosing the Right Potting Mix
Selecting the right potting mix is crucial for your orchid’s health. Orchids are epiphytes, meaning they grow on other plants or objects rather than in soil. Thus, a well-draining mix is essential. Here are some common types of orchid potting mixes:
- Bark Mix: Consists of fir bark, which provides excellent aeration and drainage. Ideal for most epiphytic orchids, like Phalaenopsis.
- Sphagnum Moss: It retains moisture well but also allows for good airflow. Suitable for orchids that require more humidity.
- Perlite and charcoal are often added to bark mixes to improve drainage and prevent root rot.
- Coconut Husk Chips: Similar to bark but holds moisture longer, suitable for orchids that need more consistent humidity.
Each type of mix has its benefits, and the choice depends on the specific needs of your orchid and the environment in which you grow it.
Step-by-Step Guide on How To Repot An Orchid
Repotting an orchid involves several careful steps to ensure the plant remains healthy and can continue to thrive. Follow this detailed guide to repot your orchid successfully.
Removing the Orchid from Its Current Pot
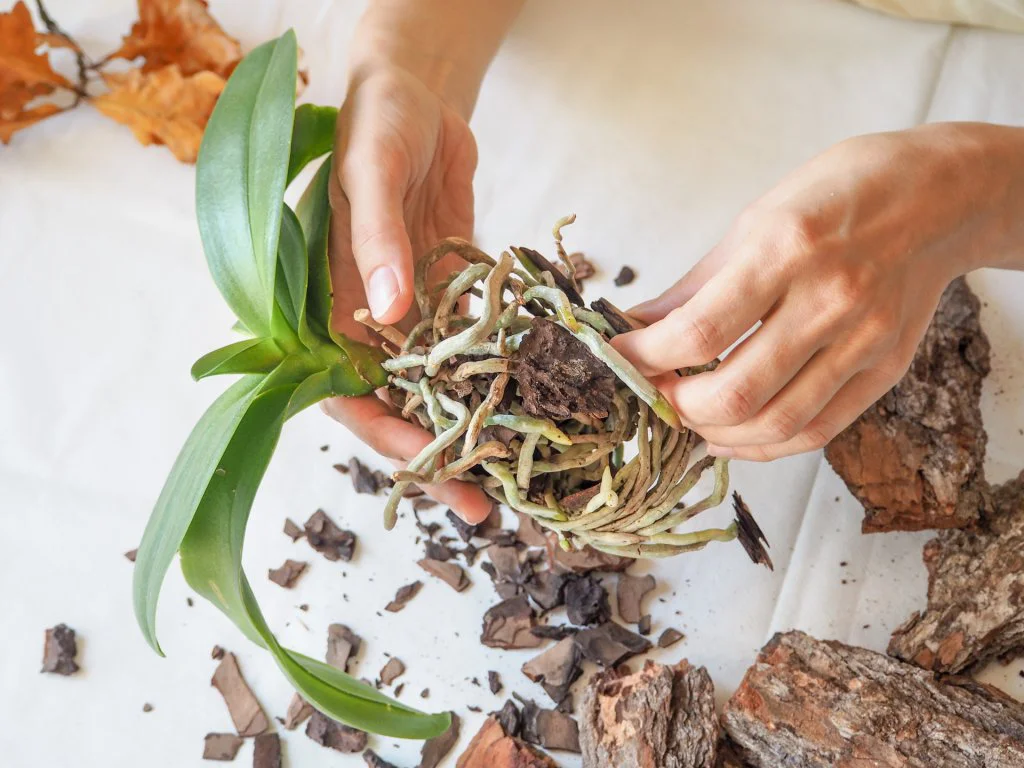
Begin by gently removing the orchid from its current pot. Here’s how:
- Loosen the Potting Mix: Lightly squeeze the sides of the pot to loosen the potting mix and roots.
- Remove the Orchid: Carefully tip the pot and gently slide the orchid out, taking care not to damage the roots.
- Free the Roots: If the roots are tightly wound around the pot or medium, use your fingers or a tool to free them gently.
Handling the roots with care during removal is crucial to prevent breakage and ensure the orchid remains healthy.
Inspecting and Cleaning the Roots
Once the orchid is out of the pot, inspect the roots for any signs of damage or disease. Follow these steps:
Trim Dead or Damaged Roots
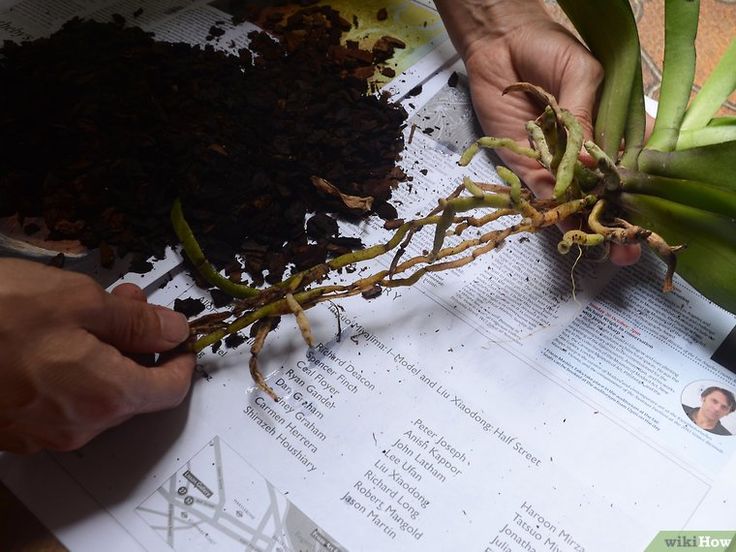
After removing your orchid from its pot, take a close look at the roots. Healthy roots should be firm and white or green. Here’s how to handle the inspection and trimming process:
- Identify Problematic Roots: Look for roots that are brown, mushy, or dried out. These are dead or damaged and should be removed.
- Sterilize Your Tools: Before cutting, make sure your scissors or pruners are sterilized. You can use rubbing alcohol or a flame to sterilize the blades.
- Trim Carefully: Use the sterilized scissors to cut away any dead or damaged roots. Cut as close to the base as possible without harming healthy tissue.
- Rinse the Roots: Gently rinse the roots with lukewarm water to remove any old potting mix or debris.
Removing unhealthy roots helps prevent diseases and allows the orchid to focus its energy on growing new, healthy roots.
Preparing the New Pot
Choosing the right pot and preparing it properly is essential for the success of the repotting process. Here’s what to do:
- Select a Suitable Pot: Choose a pot that is slightly larger than the previous one. Ensure it has adequate drainage holes to prevent waterlogging.
- Add Potting Mix: Place a layer of fresh orchid potting mix at the bottom of the new pot. This provides a stable base for the orchid.
- Positioning the Orchid: Place the orchid in the pot, ensuring the roots spread out naturally and are not cramped. The base of the plant should be just below the rim of the pot.
- Fill with Potting Mix: Gradually add more potting mix around the roots, gently pressing down to eliminate air pockets. Be careful not to pack the mix too tightly, as orchids need good air circulation around their roots.
Proper preparation of the new pot sets the stage for healthy growth and stability for your orchid.
Placing the Orchid in the New Pot
Now that your new pot is prepared, it’s time to plant your orchid.
- Place the Orchid: Position the orchid in the center of the pot, with its roots evenly distributed.
- Add Potting Mix: Slowly fill in the pot with orchid potting mix, ensuring all the roots are covered but the base of the plant remains above the mix.
- Stabilize the Plant: Gently press the potting mix around the roots to stabilize the orchid, but avoid packing it too tightly.
A stable planting ensures the orchid can adapt quickly to its new environment and begin growing strong, healthy roots.
Watering and Initial Care
After repotting, it’s crucial to provide proper initial care to help your orchid adjust to its new pot.
- First Watering: Water the orchid thoroughly, allowing the water to flow through the drainage holes. This helps settle the potting mix and ensures the roots are well-hydrated.
- Optimal Conditions: Place the repotted orchid in a location with bright, indirect light. Avoid direct sunlight, as it can be too harsh for a newly repotted orchid.
- Monitor Humidity: Orchids thrive in humid environments. Consider using a humidity tray or a room humidifier to maintain optimal humidity levels.
- Avoid Fertilizing Immediately: Wait at least a week or two before fertilizing to give the orchid time to acclimate to its new pot.
Proper initial care helps your orchid recover quickly from the repotting process and encourages healthy growth.
Aftercare for Repotted Orchids
Repotting is just the beginning. To ensure your orchid continues to thrive, consistent aftercare is essential.
Watering Schedule
Establishing a proper watering schedule is crucial for your orchid’s health.
- Frequency: Water your orchid once a week or when the potting mix feels dry to the touch. Avoid overwatering, which can lead to root rot.
- Method: Use room-temperature water and allow it to drain completely through the pot. Avoid letting the orchid sit in standing water.
Maintaining a consistent watering schedule ensures your orchid receives the right amount of moisture without the risk of waterlogging.
Light and Temperature Requirements
Providing the right light and temperature conditions is key to your orchid’s well-being.
- Light: Orchids prefer bright, indirect light. Place your orchid near an east- or west-facing window, where it can receive gentle morning or evening light.
- Temperature: Maintain a temperature range of 60–80°F (15–27°C) during the day and slightly cooler at night. Avoid placing your orchid near drafts or heating vents.
Ensuring optimal light and temperature conditions helps your orchid grow strong and produce beautiful blooms.
Fertilization and Nutrients
Fertilizing your orchid provides essential nutrients for growth and flowering.
- Frequency: Fertilize your orchid every two weeks during the growing season (spring and summer) and once a month during the dormant period (fall and winter).
- Type of Fertilizer: Use a balanced, water-soluble fertilizer specifically formulated for orchids. Follow the instructions on the label for the correct dilution.
Proper fertilization supports your orchid’s growth and enhances its ability to produce stunning flowers.
Common Problems and Solutions
Repotting an orchid can bring about various challenges, but being prepared for common problems and knowing how to address them will help you keep your plant healthy and thriving.
Root Rot
Root rot is a frequent issue for orchids, often caused by overwatering or poor drainage. Here’s how to identify, prevent, and treat root rot:
- Symptoms: Look for mushy, brown roots and a foul odor. Leaves may turn yellow and wilt.
- Prevention: Ensure your pot has adequate drainage holes and use a well-draining potting mix. Water only when the potting mix is dry.
- Treatment: Trim away affected roots with sterilized scissors and repot the orchid in fresh potting mix. Reduce watering frequency and improve airflow around the plant.
Taking these steps helps prevent and address root rot, ensuring your orchid remains healthy.
Pests and Diseases
Orchids can be susceptible to pests and diseases. Here are some common issues and how to manage them:
- Common Pests: Aphids, mealybugs, and spider mites are frequent pests. Signs include sticky residue, small insects, and webbing.
- Natural Control Methods: Use neem oil or insecticidal soap to treat infestations. Introduce beneficial insects like ladybugs to control pests.
- Chemical Control Methods: If natural methods fail, use commercial pesticides, following the instructions carefully to avoid harming the orchid.
Regularly inspecting your orchid and taking swift action helps keep pests and diseases at bay.
Yellowing Leaves
Yellow leaves can indicate several issues. Understanding the causes and remedies will help you restore your orchid’s health.
- Causes: Overwatering, insufficient light, or nutrient deficiencies are common reasons for yellowing leaves.
- Remedies:
- Adjust watering practices to ensure the potting mix dries out between waterings.
- Move the orchid to a brighter location with indirect light.
- Fertilize regularly with a balanced orchid fertilizer to address nutrient deficiencies.
Addressing these factors helps restore the vibrant green color of your orchid’s leaves.
FAQs About Repotting Orchids
To provide even more value, here are answers to some frequently asked questions about repotting orchids.
How Often Should I Repot My Orchid?
Most orchids should be repotted every 1–2 years. However, this can vary based on the type of orchid and its growth rate. Regularly check the condition of the potting mix and the roots to determine if repotting is needed.
Can I use regular potting soil for orchids?
No, regular potting soil is too dense and retains too much moisture for orchids. Orchids require a specialized potting mix that provides excellent aeration and drainage, such as bark, sphagnum moss, or a mix designed specifically for orchids.
What Should I Do If My Orchid Looks Unhealthy After Repotting?
If your orchid appears unhealthy after repotting, consider these steps:
- Check Root Health: Ensure you have trimmed away all dead or damaged roots.
- Adjust Watering: Avoid overwatering and allow the potting mix to dry out between waterings.
- Improve Light and Humidity: Ensure the orchid receives adequate indirect light and maintains proper humidity levels.
How Long Does It Take for an Orchid to Adjust After Repotting?
It can take a few weeks to a few months for an orchid to fully adjust after repotting. During this time, focus on providing optimal care, including proper watering, light, and humidity.
Additional Tips for Successful Orchid Care
Beyond repotting, there are several other factors to consider for successful orchid care.
Monitoring Humidity Levels
Orchids thrive in humid environments. Aim for a humidity level of 50–70%. Use a humidity tray or a room humidifier to maintain the right conditions, especially during dry seasons.
Pruning and Deadheading Flowers
Regular pruning and deadheading can encourage new growth and prevent diseases.
- Pruning: Trim away any dead or damaged leaves and stems with sterilized scissors.
- Deadheading: Remove spent flowers by cutting the stem just above a node, encouraging new blooms.
Regular Health Checks for Your Orchid
Perform regular health checks to catch issues early:
- Inspect Roots and Leaves: Look for signs of pests, diseases, or nutrient deficiencies.
- Check Potting Mix: Ensure the potting mix remains fresh and well-draining.
Consistent monitoring helps maintain your orchid’s health and ensures it continues to thrive.
Conclusion
Repotting an orchid may seem daunting, but with the right knowledge and preparation, it becomes a manageable and rewarding task. By following this comprehensive guide, you can ensure your orchid remains healthy, vibrant, and beautiful. Remember, proper timing, careful handling, and consistent aftercare are key to successful repotting. Happy growing!

